tp
Developer Guide
- Developer Guide
Introduction
Welcome to ATHENA’s Developer Guide! ATHENA (which stands for Automated Timetable Helper Encourager n’ Assistant), is a desktop daily life planner that aims to help students automate the process of organising their schedule. It is a Command Line Interface (CLI) based application that helps users figure out the best timetable after the user has input their pre-allocated time slots for work and relaxation.
This document describes the software architecture and design of ATHENA that should hopefully help you - a developer, designer, or software tester - understand the inner workings of ATHENA.
Do refer to the glossary if you encounter any unfamiliar terms used in this document.
Setting up and getting started
Prerequisites
- Ensure you have
JDK 11installed on your computer. - Install IntelliJ IDEA (referred to as IntelliJ in the rest of this document).
Setting up the project in your computer
- Fork this repository, and clone the fork onto your computer.
- Open IntelliJ (If you do not see the welcome screen, click
File>Close Projectto close the existing project dialog first). - Set up the correct JDK version for Gradle
- Click
Configure>Project Defaults>Project Structure. - Click
New…and select the directory where you have installedJDK 11. - Click
OK.
- Click
- By default, IntelliJ has the Gradle plugin installed. If you have disabled it, go to
File>Settings>Pluginsto re-enable it. - Click
Import Project(orOpen or Importin newer versions of IntelliJ). - Locate the
build.gradlefile and select it. ClickOK. If prompted, choose toOpen as Project(notOpen as File). - Click
OKto accept the default settings, if prompted. - Wait for the importing process to finish, then you are good to go!
- Verify the setup:
- Run
Athenaand try a few commands such aslistorhelp. - Run the JUnit tests to ensure they all pass.
- Run
Design & implementation
Architecture
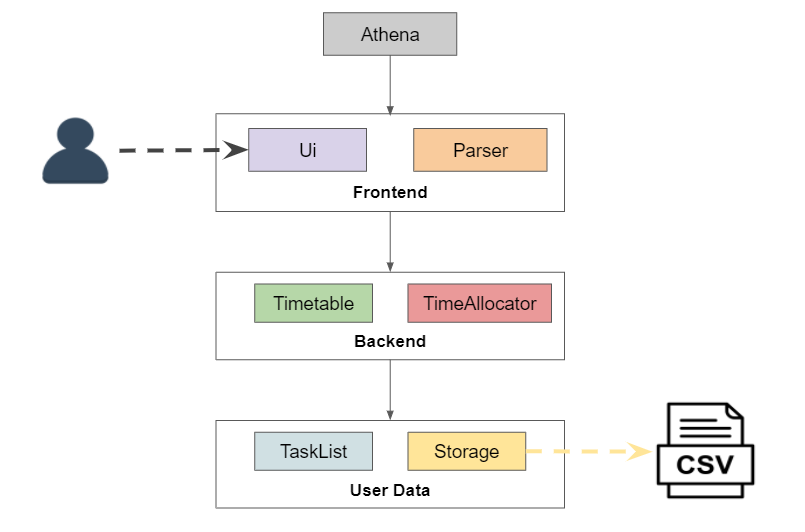
The Architecture Diagram shown above displays the high-level design of ATHENA. It is done with an N-tier architectural style, where the higher layers make use of services provided by lower layers. A quick overview of each component is shown below.
Athena is responsible for:
- At application launch: Initializes the components and connects them up with each other.
- At application shut down: Shuts down the components.
The rest of the application mainly consists of these components:
Ui: The user interface of ATHENA.Parser: The component that parses user input and executes commands.TaskList: The list storing all the user’s tasks.Storage: The component that reads data from, and writes data to, the hard disk.TimeAllocator: The component that allocates tasks without a specified time to a free time slot.Timetable: The component to generate an output for the list command.
The sections below provide more details for each component.
UI component
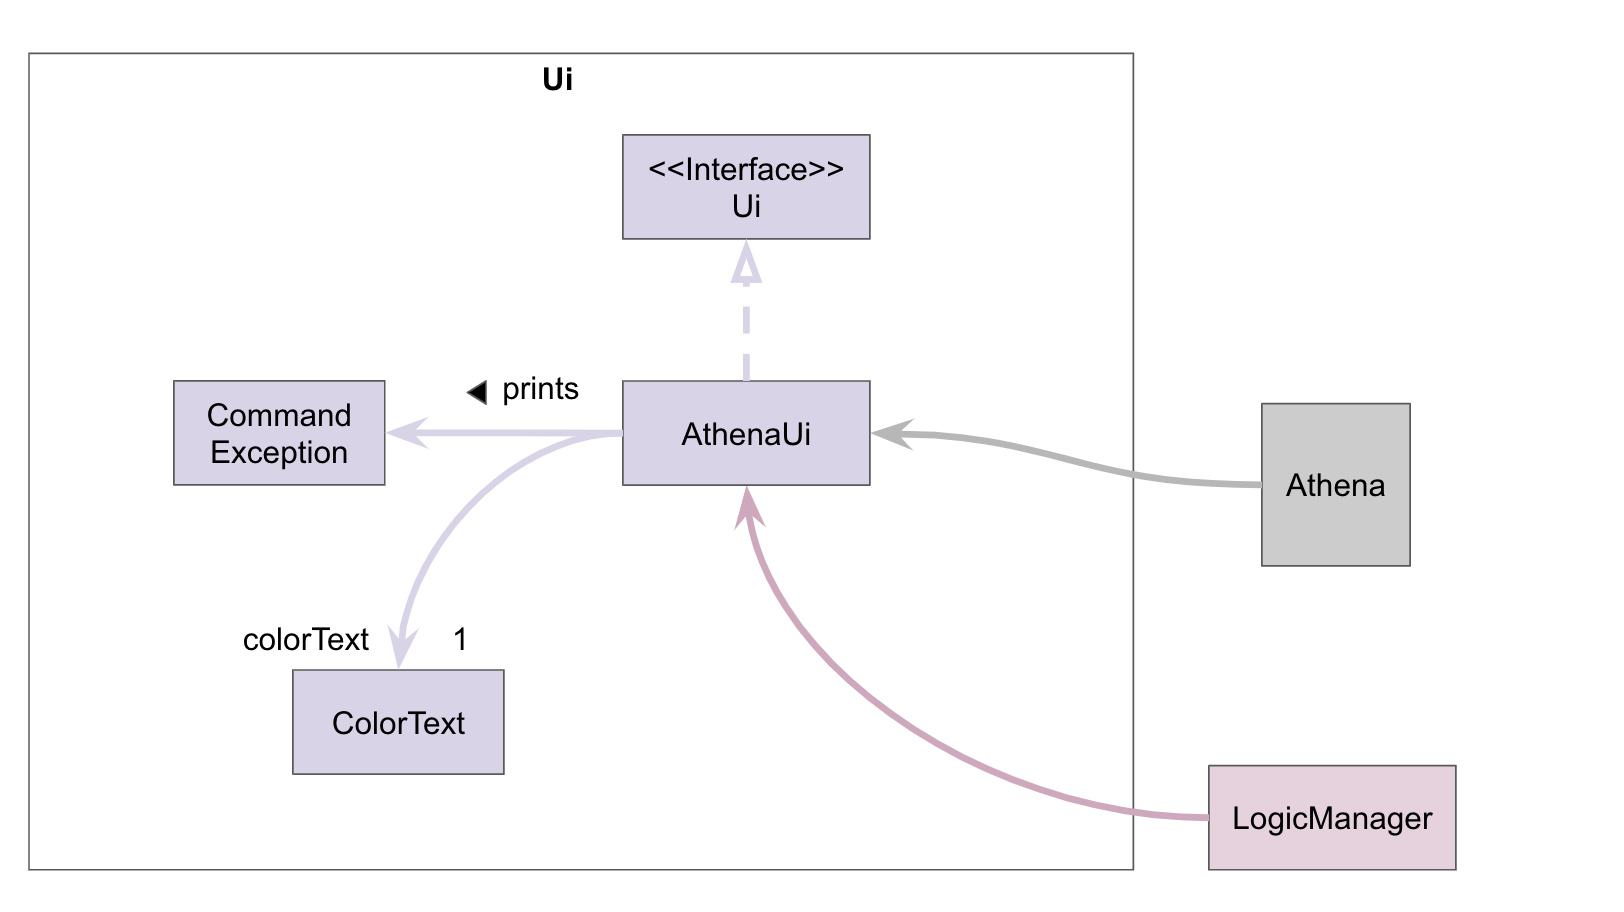
Uiconsists ofAthenaUiandColorText.AthenaUiimplements theUiinterface and outputs messages that the user sees.ColorTextapplies relevant colors to certain output messages.AthenaUialso prints out error messages tied toCommandExceptions that get thrown byCommands inAthena.LogicManagerrequiresAthenaUito execute user commands.
Parser component
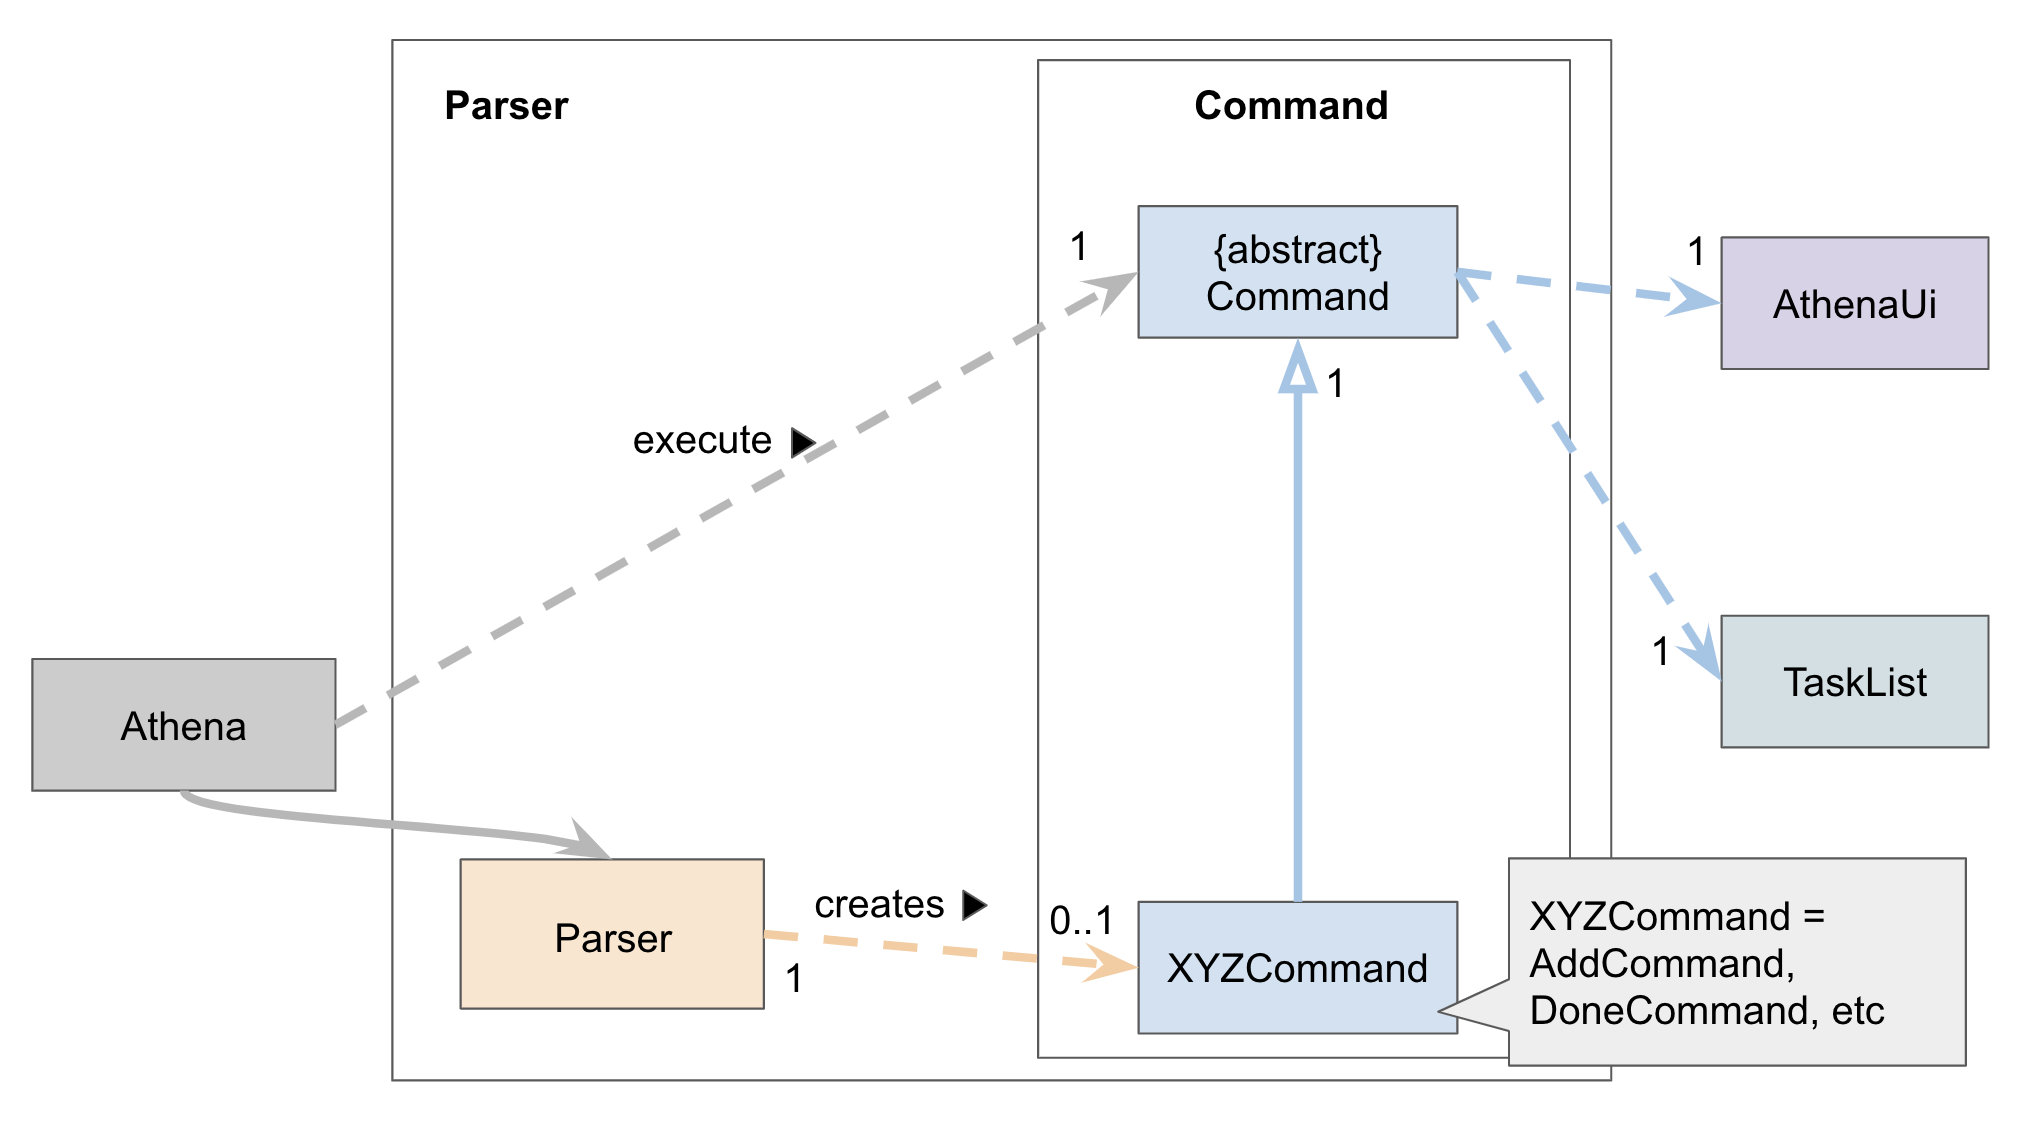
Parserclass will parse the user command.- A
Commandobject is then created, which is executed byAthena. - The command execution can alter the
TaskList(e.g. Adding a task). - At the end of each command execution, a corresponding method in
AthenaUiis called to print a message to the user.
The following sequence diagram illustrates how the Parser works:
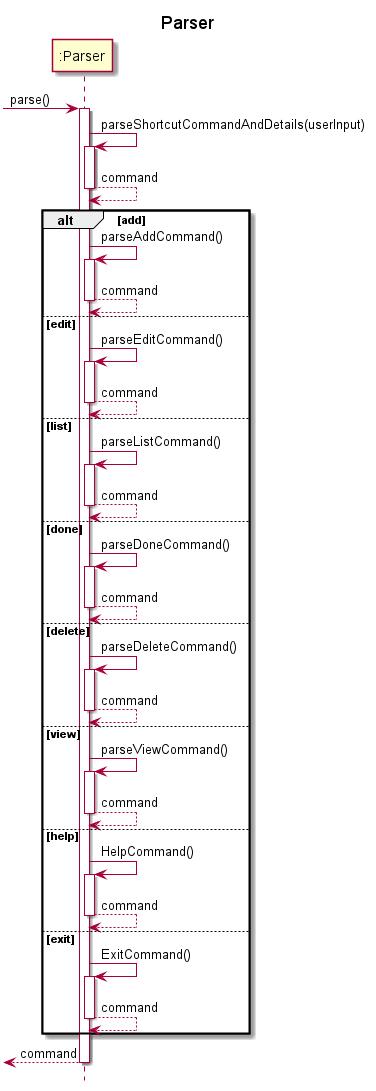
The respective Command sequence diagrams are illustrated here under the Implementation section of this document.
TaskList component
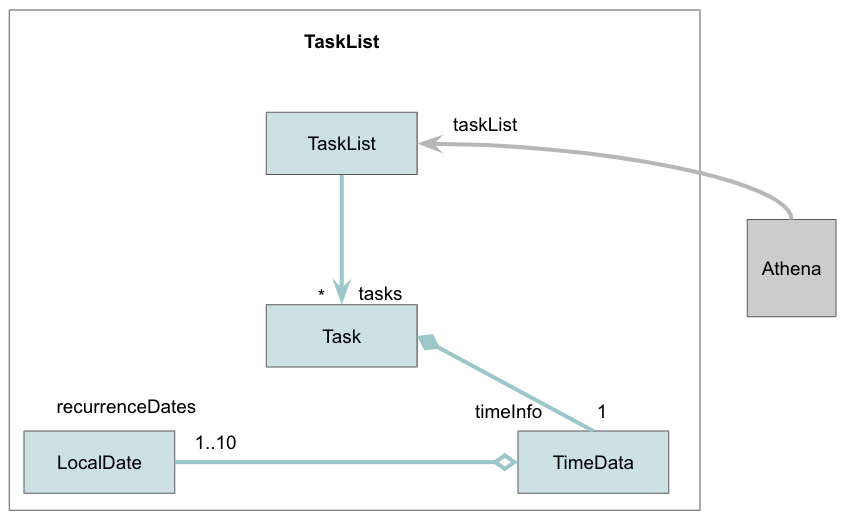
- The
TaskListstores task data inTasktype objects. - The
TaskListis updated inAthena. - A new
Taskobject is created everytime the user uses the add command. - The
Taskobject is removed with the delete command.
Storage component
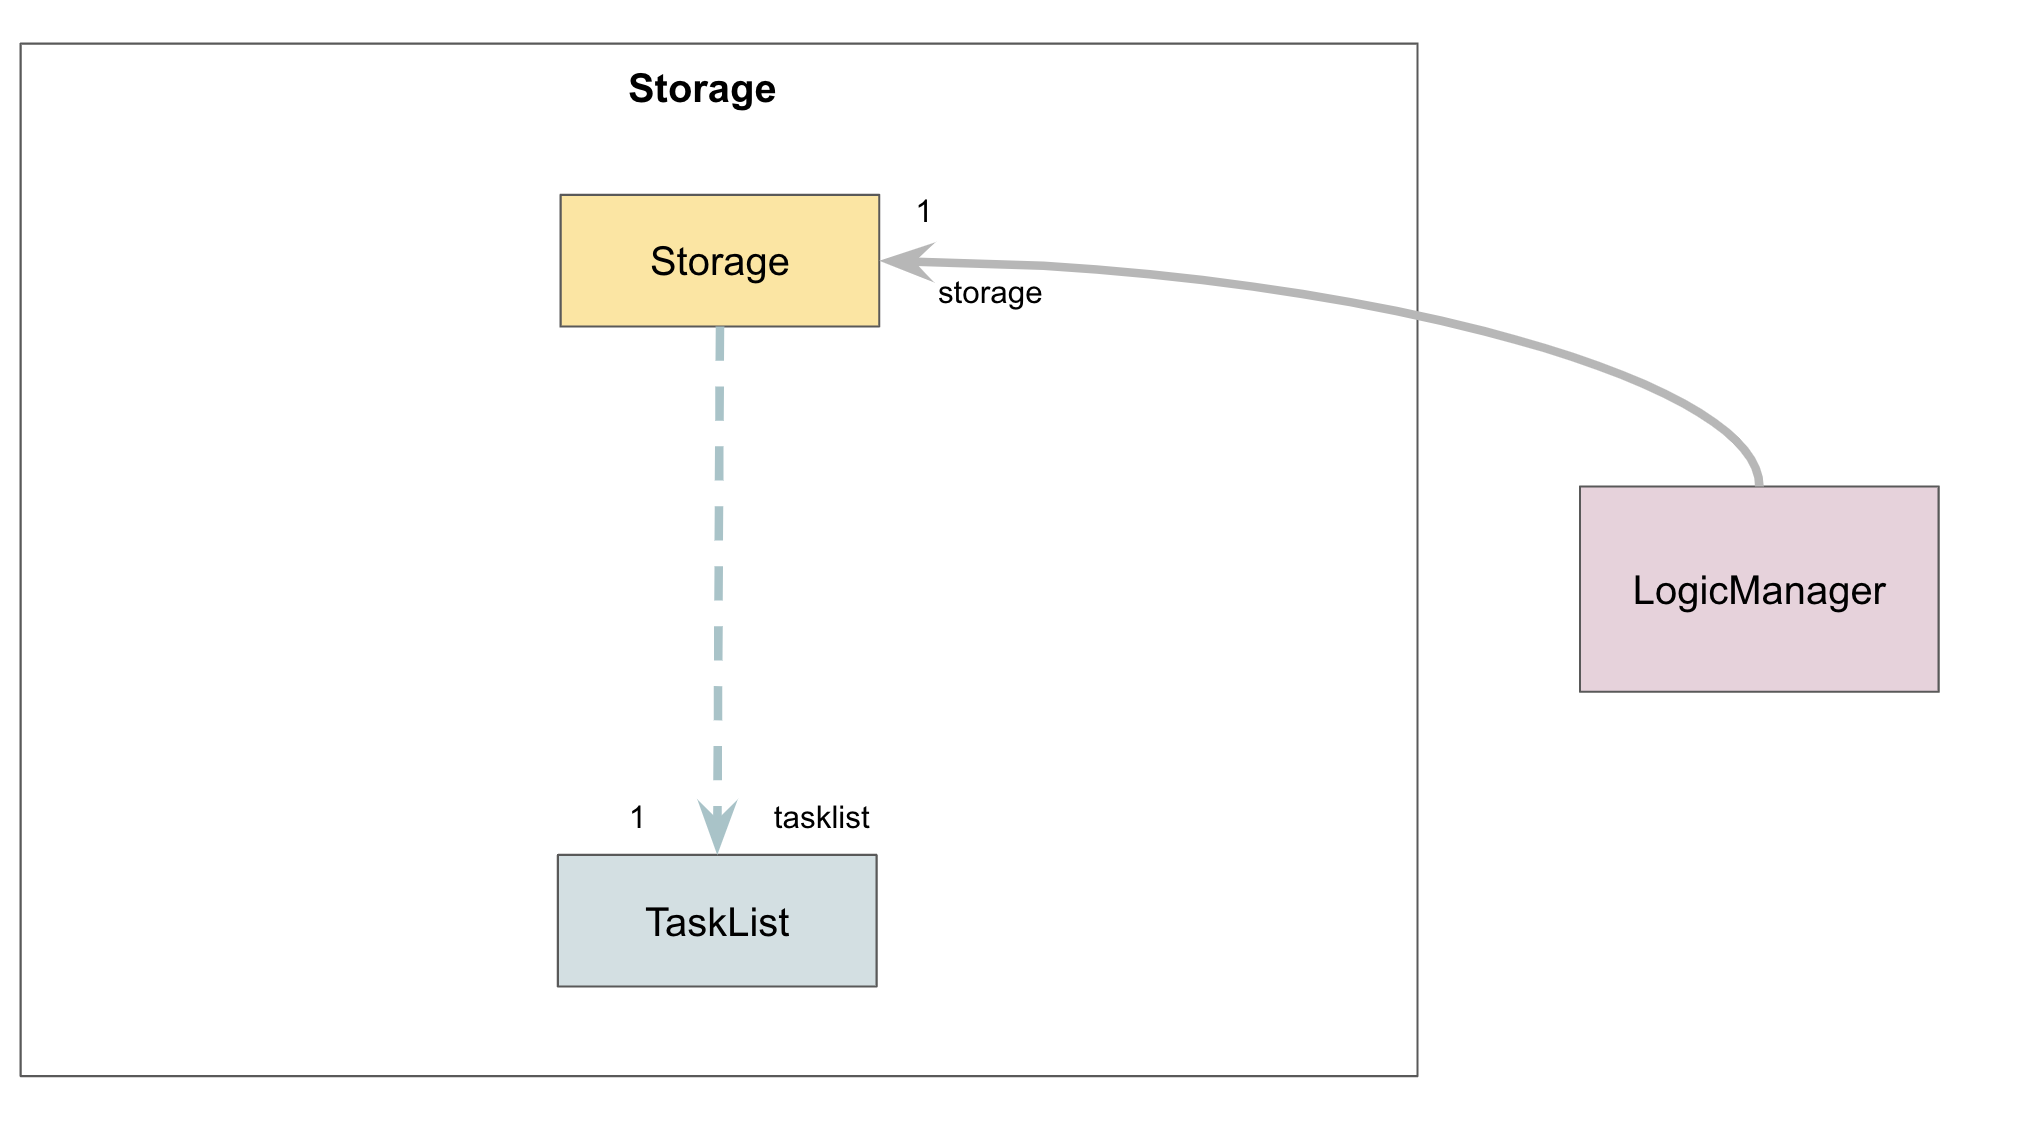
- The
Storagetakes in aTaskListobject and converts it into an equivalent .csv file. Athenacreates aTaskListfromdata.csv.
TimeAllocator component
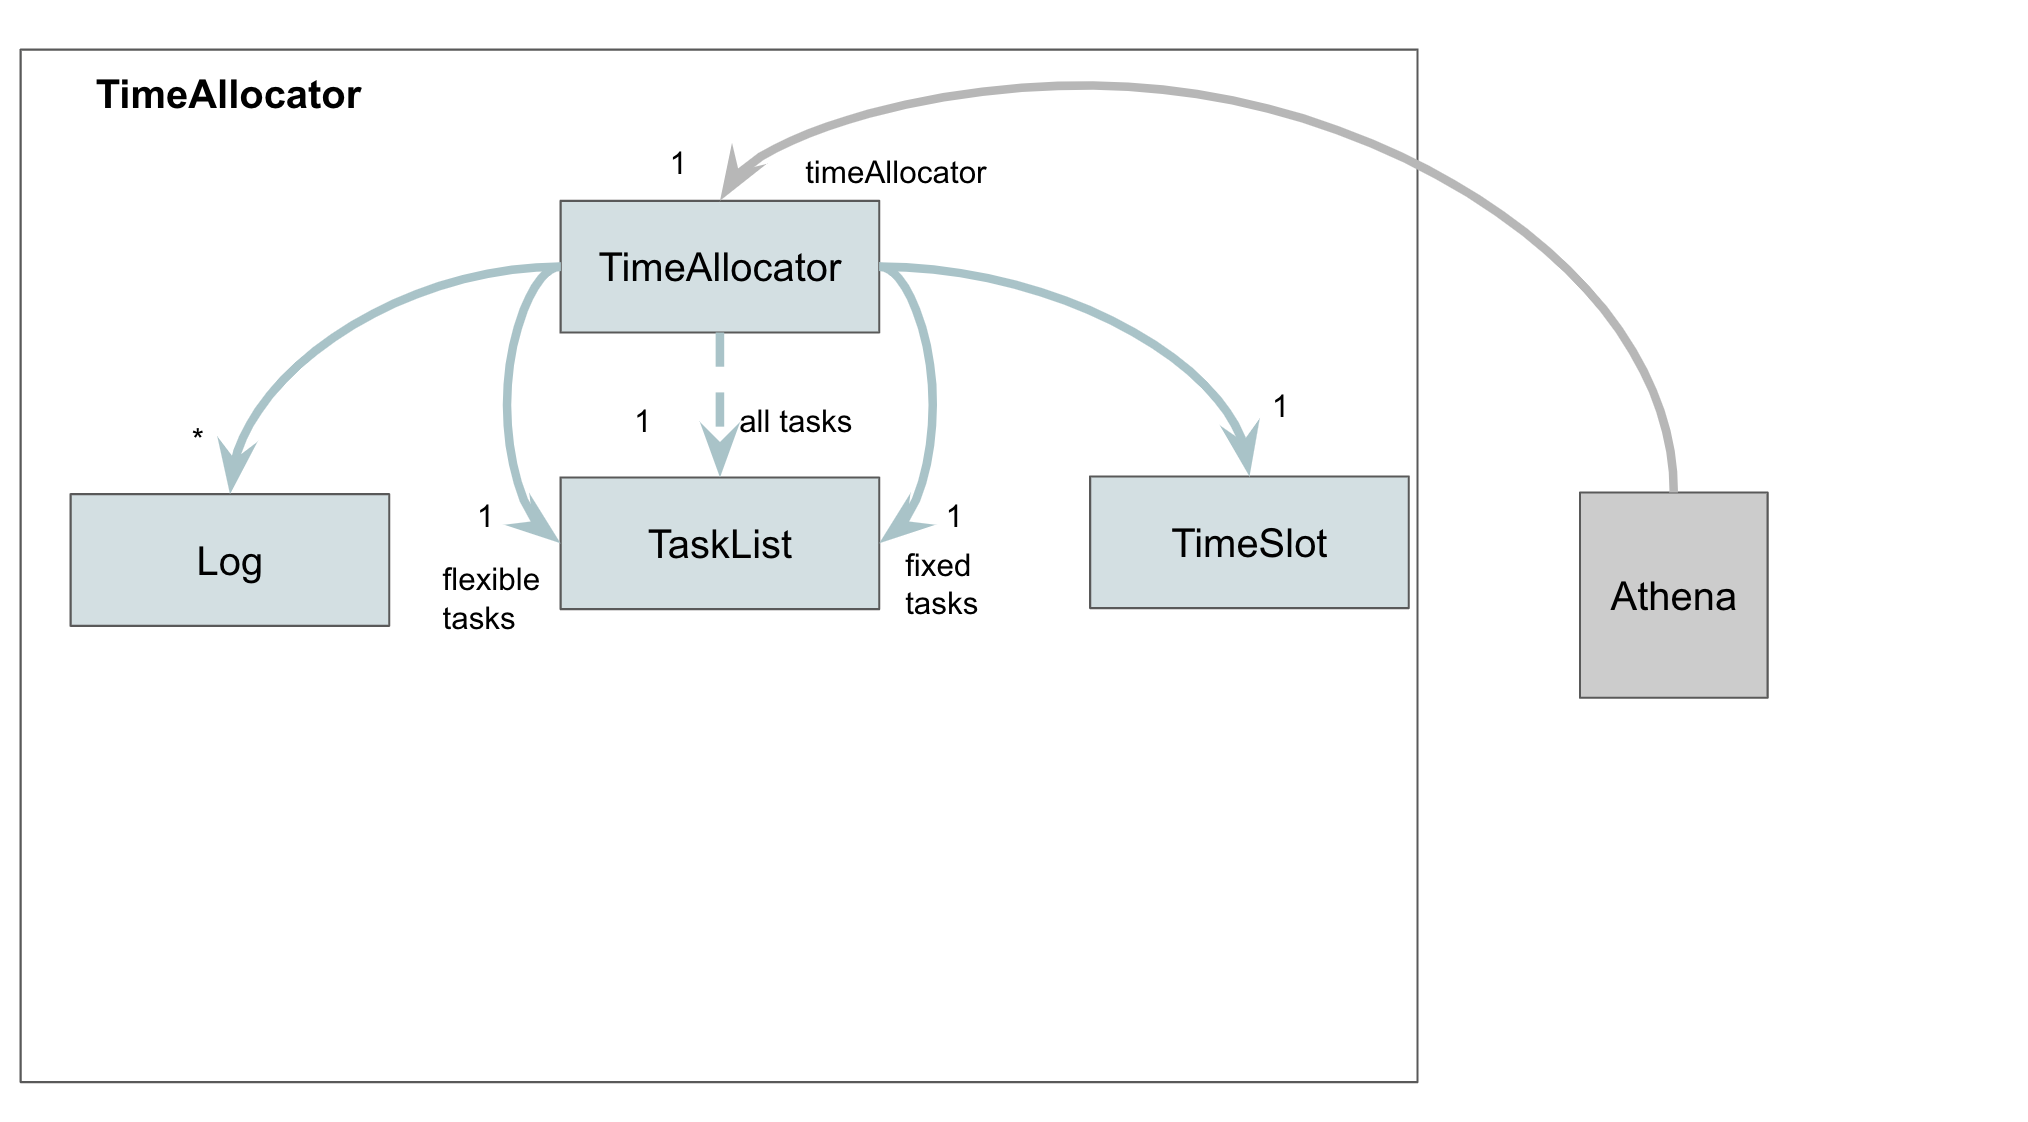
The TimeAllocator allocates tasks without a specified time to a free time slot. i.e. Tasks that were added using the add command without the t/ parameter.
- The
TimeAllocatorkeeps track of 3TaskLists. One containing all of the user’s tasks, one containing only fixed tasks, and another containing only flexible tasks. - The
TimeAllocatorcreatesLogs and aTimeSlotwhen allocating tasks.
Timetable component
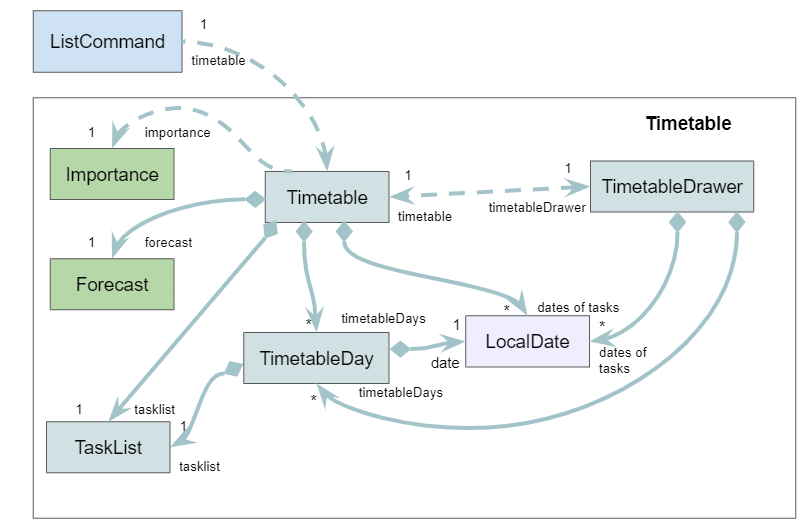
The Timetable component is used to generate an output for the list command, when the user requests for Athena to print out the existing tasks. It groups the tasks by their dates and draws an ASCII art timetable for the user.
- The
ListCommandcreates aTimetableto generate an output when the user enters the list command. - The
Timetableuses the specifiedImportanceandForecastto filter the tasks in theTaskList. It also stores theForecastfor later use. - The
Timetablegroups the tasks by theirLocalDatein aTimetableDay. - The
Timetablealso creates aTimetableDrawerthat is used to generate the timetable ASCII art. - The
TimetableandTimetableDrawerstore aTreeMap<LocalDate, TimetableDay>to query for aTimetableDaybased on a specificLocalDatequickly.
Implementation
This section describes some important details about how certain features are implemented.
Data storage
When Athena is launched, it loads the tasks saved in data.csv, a comma-separated values (csv) file located in the same directory as the program JAR file. After processing a command issued by the user, Athena automatically saves the tasks into data.csv.
The storage mechanism is facilitated by Storage. It reads and writes the Task objects in TaskList to data.csv.
It implements the following operations:
Storage#saveTaskListData- Writes the current tasks into the save file.Storage#loadTaskListData- Loads the tasks from the save file into the application.
These operations are called by Athena, when the program is launched, and after each user command.
Given below is an example usage scenario and how the storage mechanism behaves at each step.
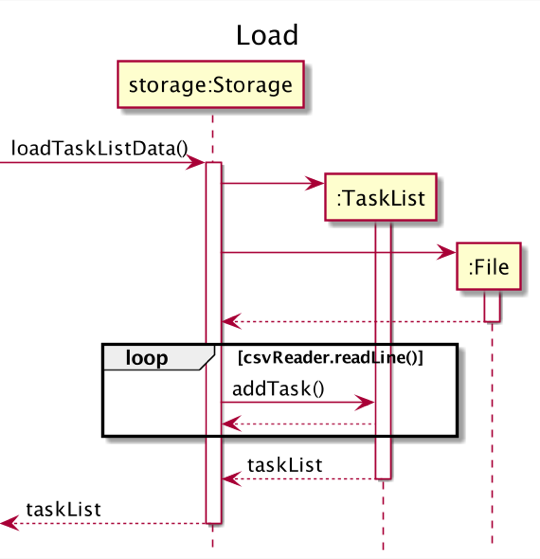
Step 1. The user launches the application for the first time. The TaskList is initialized to be empty. At this time, there is no data.csv file present. So, when Storage calls Storage#loadTaskListData, this is detected and an empty data.csv file is created next to the jar file. Since there was no save file, the TaskList remains empty.
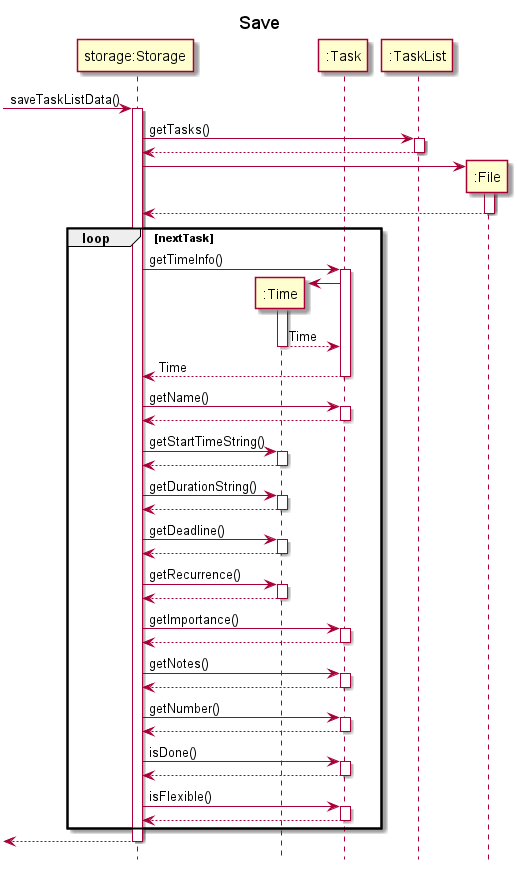
Step 2. The user adds a task to the application, by executing add n/Assignment1 t/1100 D/16-09-2020 d/2 r/Today i/high a/Refer to lecture notes. The TaskList now contains 1 task (Assignment 1). After the command is executed, Athena calls Storage#saveTaskListData to automatically save the tasks in the TaskList into the save file.
Step 3. The user closes the application. Nothing happens since the data in the TaskList is already saved.
Step 4. The user launches the application again. The TaskList is initialized to be empty. Storage#loadTaskListData will read from data.csv and add the tasks inside the file into the empty TaskList. The TaskList now contains the task added earlier (Assignment 1) in Step 3.
The following sequence diagram illustrates how the loading from storage operation works:
The following sequence diagram illustrates how the saving to storage operation works:
User command processing
The processing of user commands is facilitated by AthenaUi, Parser and the Command` subclasses.
The following operations are implemented:
AthenaUi#detectInput- Read user input from the standard input stream.-
Parser#parse- Split the user’s input based on the command type and the various parameters given. The parameters can be entered in any order. ACommandobject based on the type of command entered is returned.The following table shows each command with their corresponding
Commandsubclass.Command Type CommandSubclassadd AddCommandedit EditCommandlist ListCommanddone DoneCommanddelete DeleteCommandview ViewCommandhelp HelpCommandexit ExitCommand
Step 1. The user input will be read in by the AthenaUi class. Athena will call for Parser#parse to parse the user input and retrieve the respective command type and parameters.
Step 2. Parser#parse will then create a Command object based on the user input. The Command object is returned to Athena.
Step 3. Athena will call Command#execute to execute the command.
The specific implementation of each command is explained in the following subsections.
Add task feature
The mechanism to add a task is facilitated by the AddCommand class. The user is able to add a task with the add command.
AddCommand#execute is called and the Task described by the user input is added to the TaskList.
AddCommand and TaskList implements the following operations:
AddCommand#execute- Adds the specified task intoTaskListand callsAthenaUito print a message to the output.TaskList#addTask- Creates a task based on the given parameters and adds it into the list.
The process starts with Parser#parse parsing the user input and returns an AddCommand object. This is described in the user command processing section.
Given below is an example usage scenario and how the task adding mechanism behaves at each step.
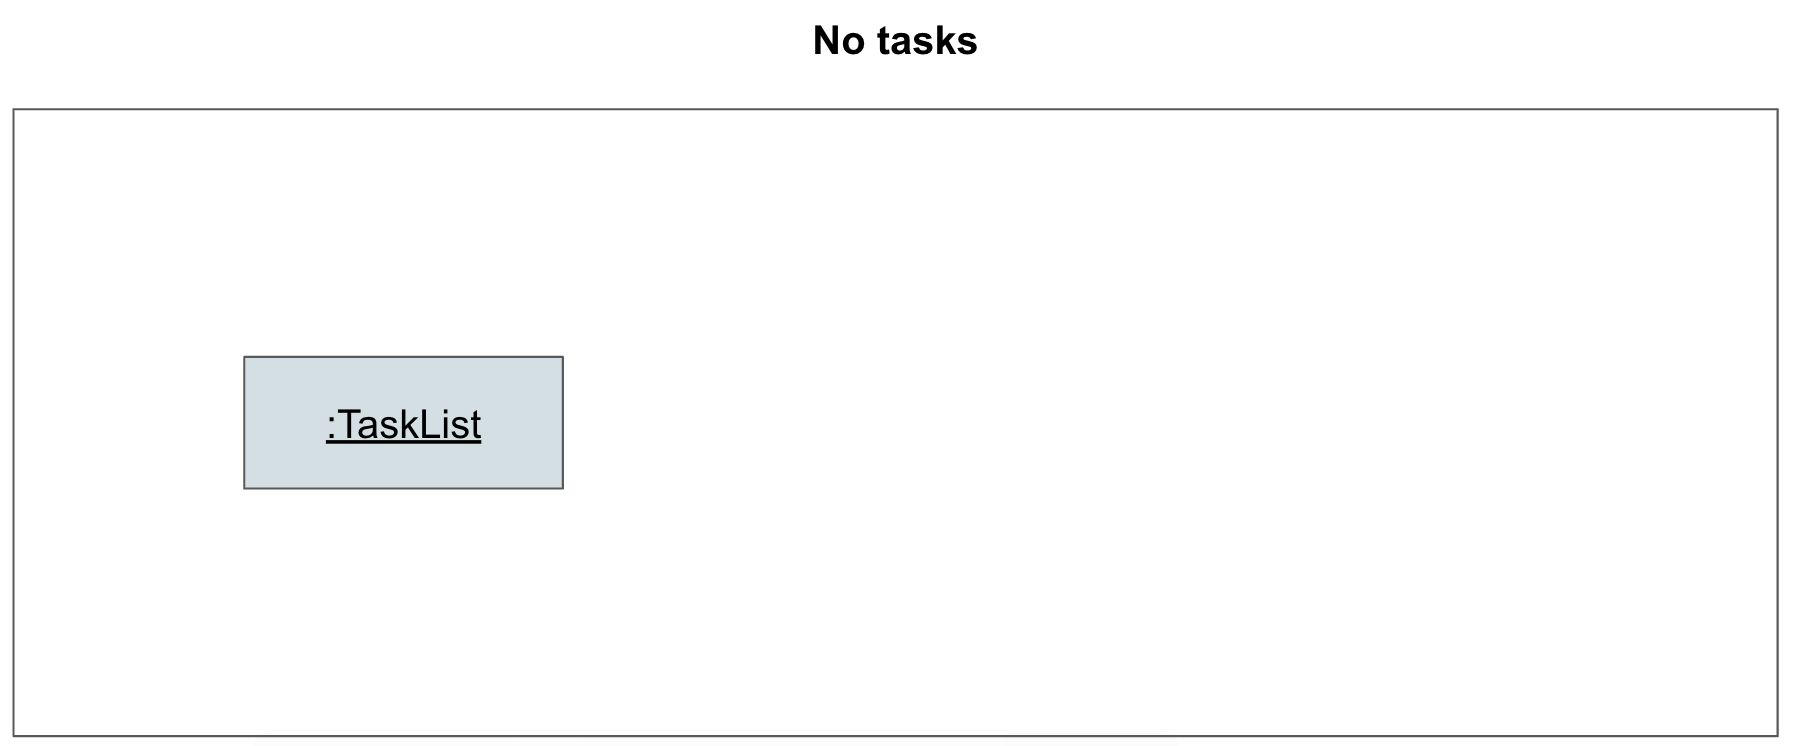
Step 1. The user launches the application for the first time. The TaskList is initialized to be empty.
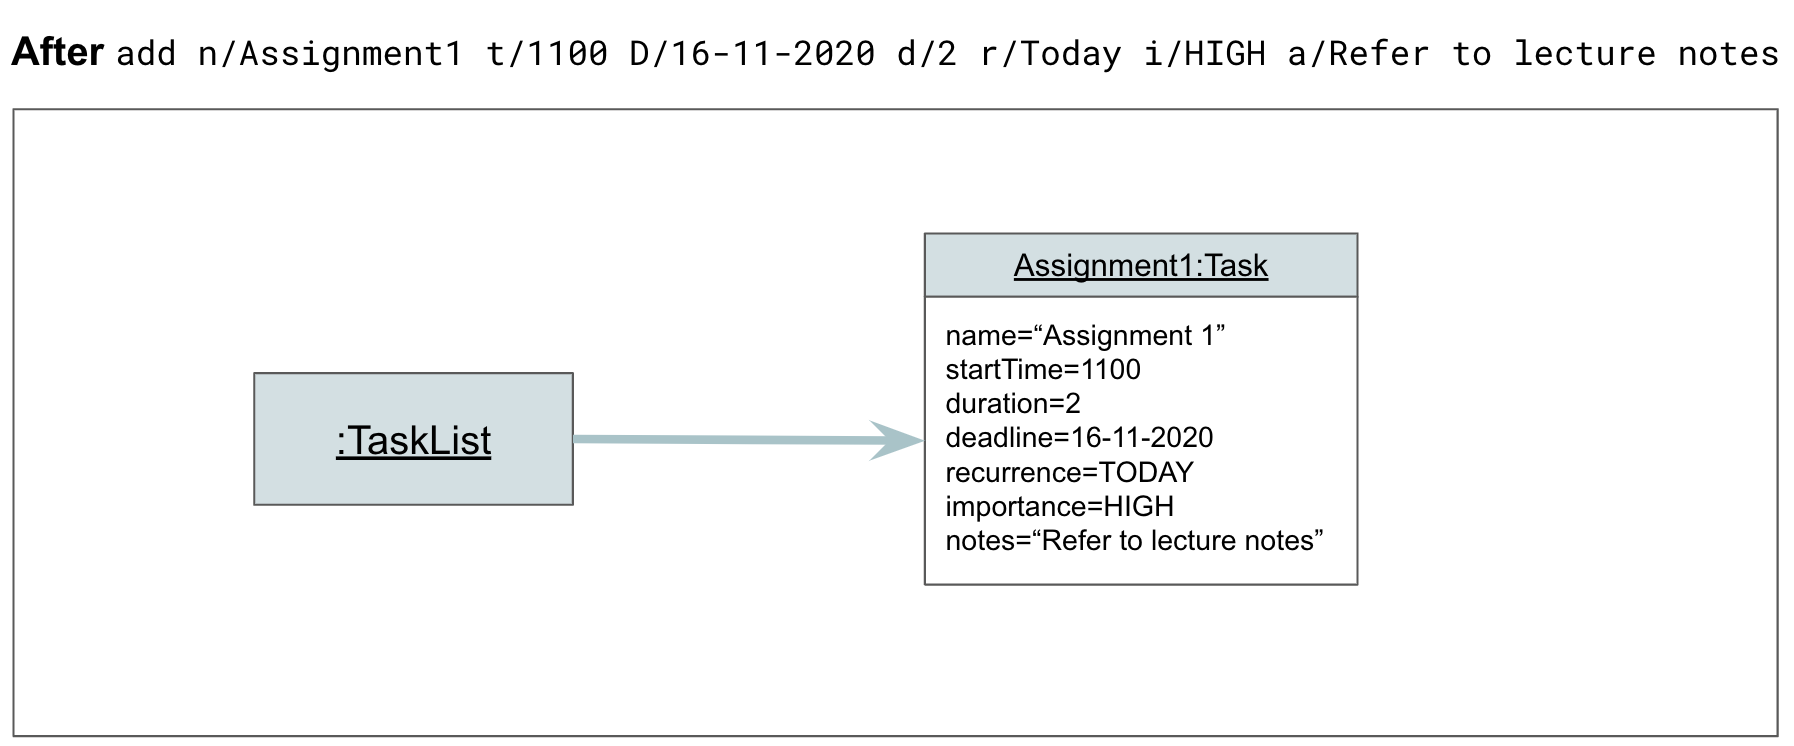
Step 2. The user adds a task to the application, by entering add n/Assignment1 t/1100 D/16-11-2020 d/2 r/Today i/high a/Refer to lecture notes. Parser#parse parses the user input, and creates an AddCommand object. The AddCommand object is returned to Athena.
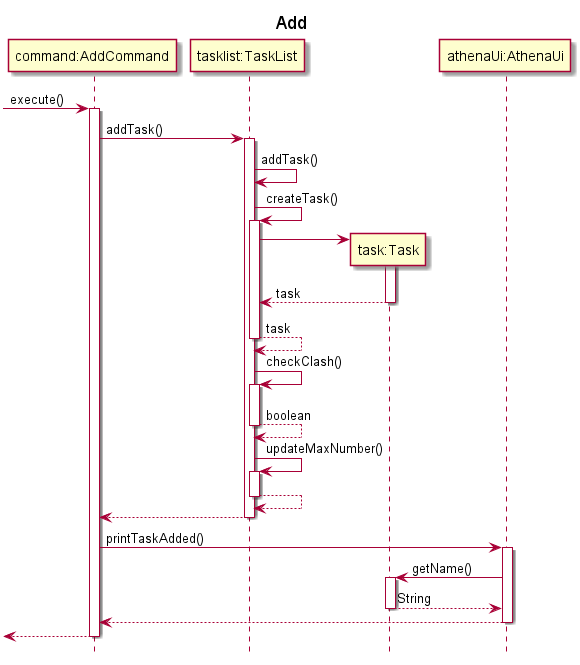
Step 3. Athena calls AddCommand#execute, which calls TaskList#addTask to create a task based on the given parameters, and adds the task to the list. The TaskList now contains 1 task (Assignment1).
Step 4. AthenaUi prints a message to inform the user of whether the command has succeeded or failed.
The following sequence diagram illustrates how Step 3 of the task adding operation works:
Edit task feature
The mechanism to edit a task is facilitated by the EditCommand class. The user is able to edit a task with the edit command.
EditCommand#execute is called and the Task described by the user input is edited in the TaskList.
EditCommand, TaskList implements the following operations:
EditCommand#execute- Edits the specified task inTaskListand callsAthenaUito print a message to the output.TaskList#editTask- Edits a task based on the given parameters and adds the updated task into the list.
The process starts with Parser#parse parsing the user input and returns an EditCommand object. This is described in the user command processing section.
Given below is an example usage scenario and how the task editing mechanism behaves at each step.
Step 1. The user launches the application. The TaskList contains at least one Task.
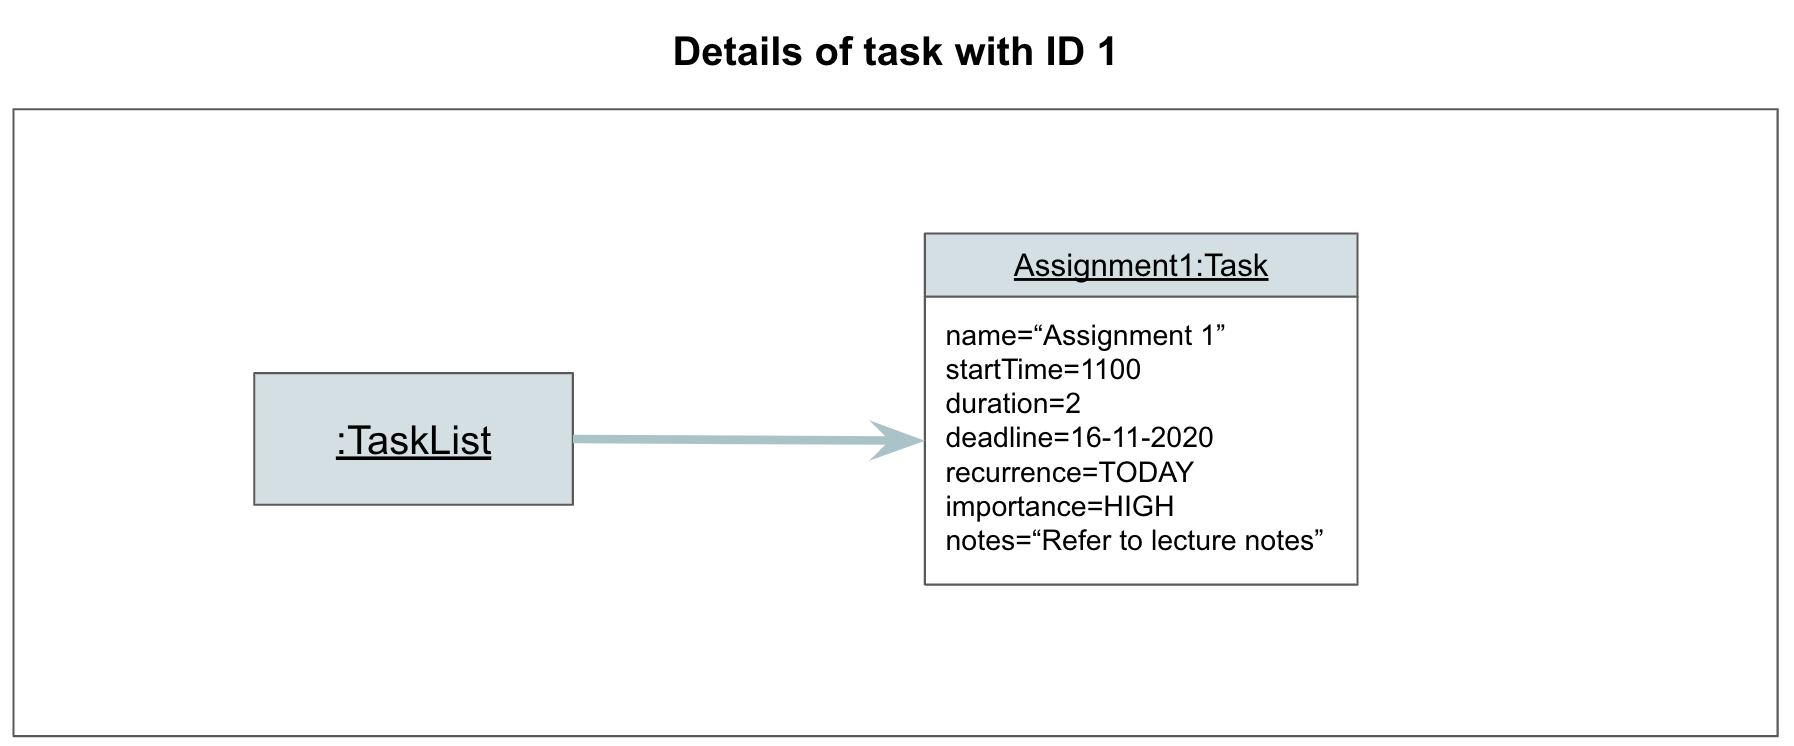
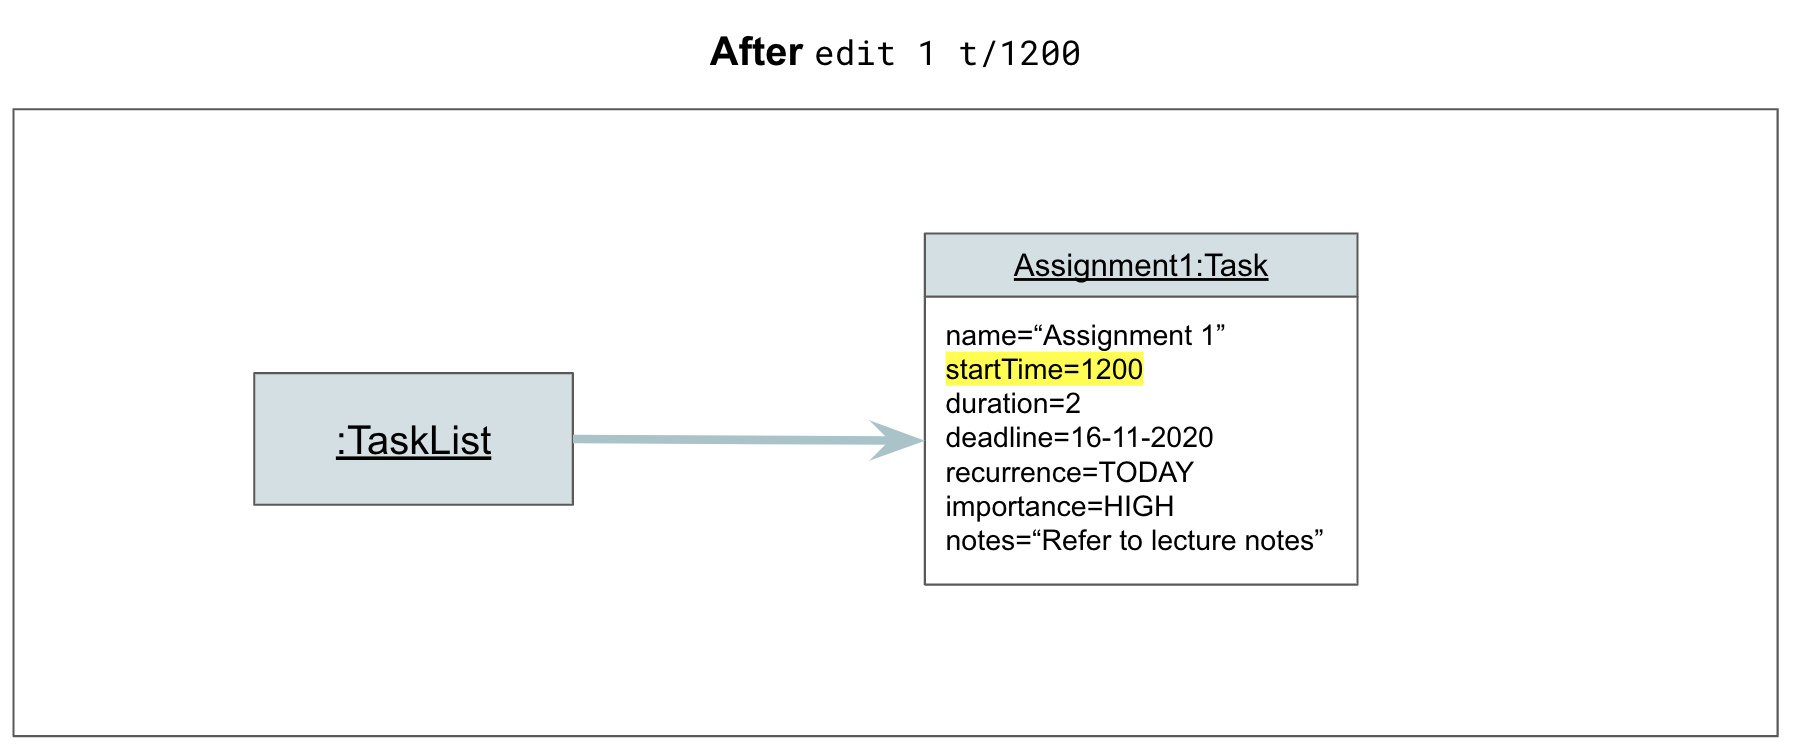
Step 2. The user edits a task to the application, by inputting edit 1 t/1200. Parser#parse parses the user input, and creates an EditCommand object. The EditCommand object is returned to Athena.
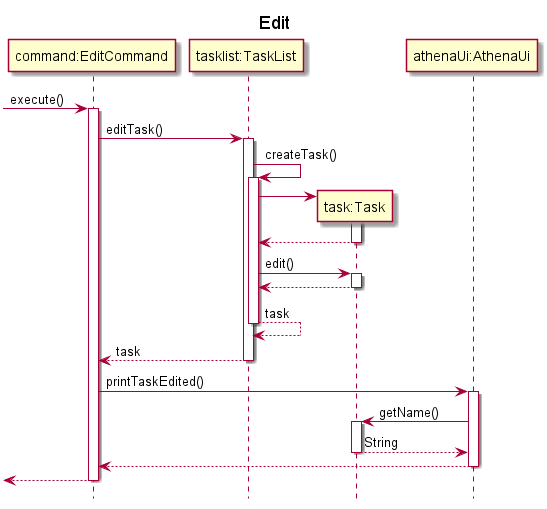
Step 3. Athena calls EditCommand#execute, which calls TaskList#editTask to edit the specified task based on the given parameters. The TaskList now has the start time of task with index 1 changed from “1100” to “1200”.
Step 4. AthenaUi prints a message to inform the user of whether the command has succeeded or failed.
The following sequence diagram illustrates how Step 3 of the editing task operation works:
List feature
The mechanism to print out the user’s tasks is facilitated by the ListCommand class. The user is able to see a list of their tasks with the list command, and can provide filters to display the tasks based on their Importance and Time.
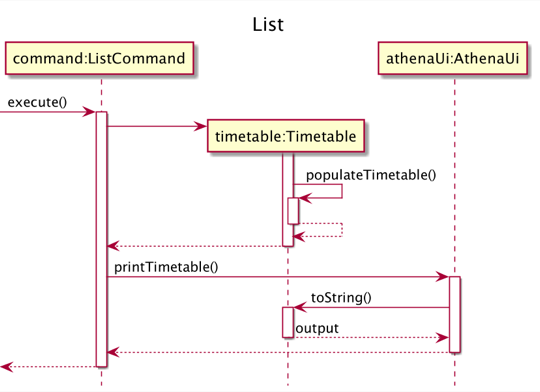
ListCommand#execute is called, and a Timetableis used to group the user’s tasks by their dates before printing them out.
ListCommand and Timetable implements the following operations:
ListCommand#execute- Passes the given filters toTimetable.Timetable#populateTimetable- Groups the tasks by their dates in aTimetableDay.Timetable#toString- Prepares a string with a ASCII art timetable and a list of the user’s tasks, so that it can be printed to the user.
The process starts with Parser#parse parsing the user input and returning a ListCommand object. This is described in the user command processing section.
Given below is an example usage scenario and how this mechanism behaves at each step.
Step 1. The user launches the application. The TaskList contains the Tasks for the week.
Step 2. The user wants to see the HIGH IMPORTANCE tasks within one week from now, by entering list i/HIGH f/WEEK. Parser#parse parses the user input, and creates a ListCommand object. The ListCommand object is returned to Athena.
Step 3. Athena calls ListCommand#execute, which creates a Timetable with the TaskList and the filter values provided by the user. Timetable calls Timetable#populateTimetable to groups
Step 4. AthenaUi prints the output generated by Timetable#toString.
Mark task as done feature
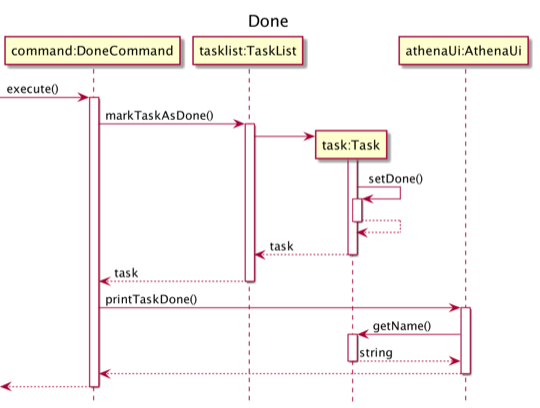
The mechanism to mark a task as done is facilitated by the DoneCommand class. The user can use this feature through the done command.
DoneCommand#execute is called and the Task selected by the user is marked as done by the TaskList.
DoneCommand and TaskList implements the following operations:
DoneCommand#execute- Passes the task number of the corresponding task toTaskListto mark the task as done, then callsAthenaUito print a message to the output.TaskList#markTaskAsDone- Searches for the task with the given number, and marks it as done.
The process starts with Parser#parse parsing the user input and returning a DoneCommand object. This is described in the user command processing section.
Given below is an example usage scenario and how this mechanism behaves at each step.
Step 1. The user launches the application. The TaskList contains at least one Task.
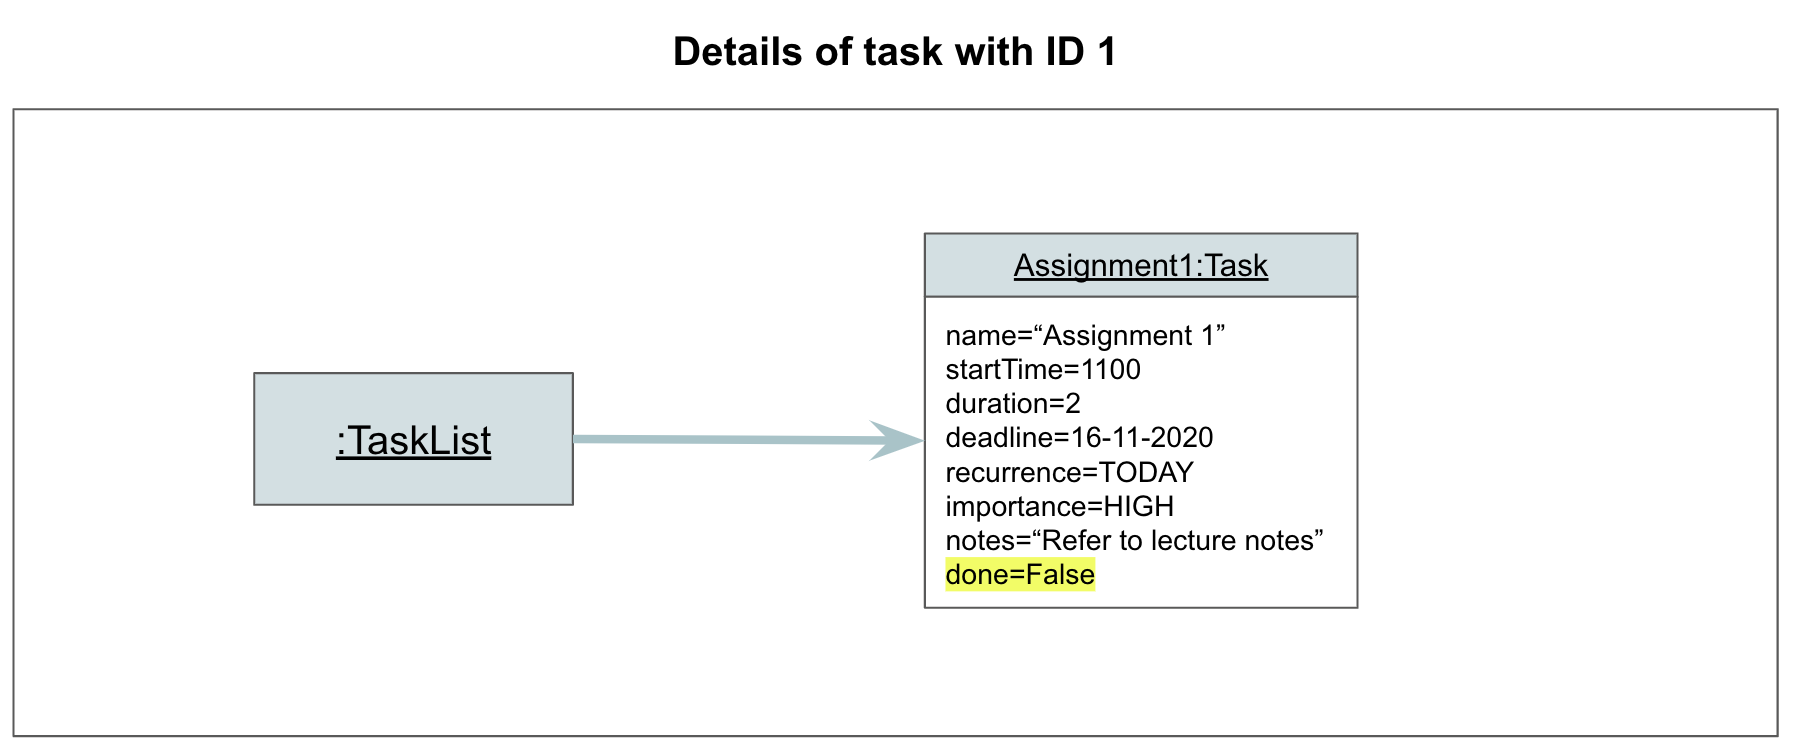
Step 2. The user marks Task 1 as done, by entering done 1. Parser#parse parses the user input, and creates a DoneCommand object. The DoneCommand object is returned to Athena.
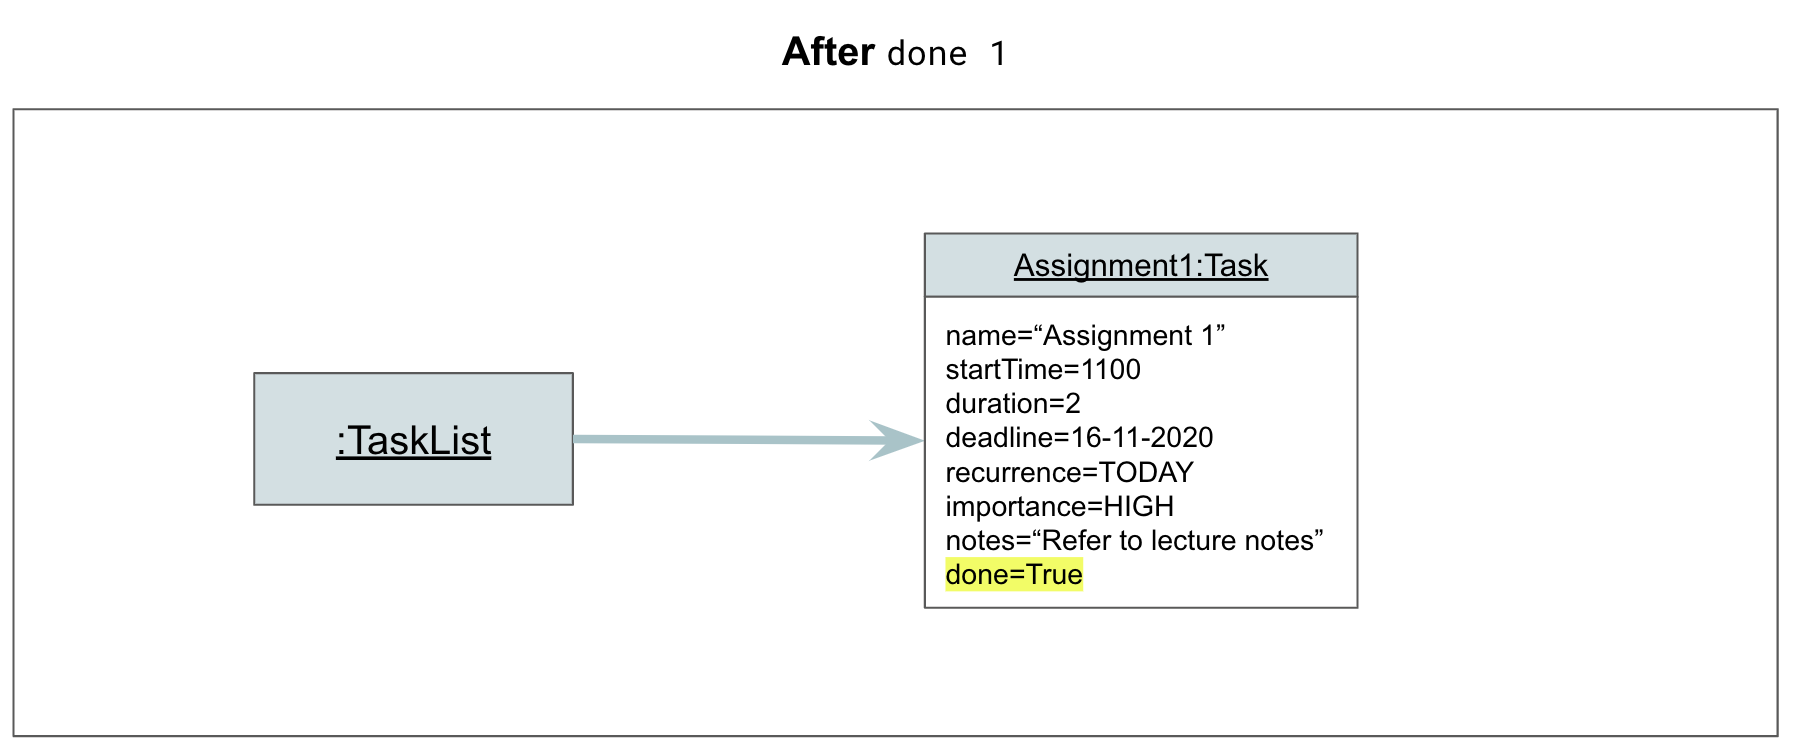
Step 3. Athena calls DoneCommand#execute, which calls TaskList#markTaskAsDone to mark Task 1 as done. Task 1 is now marked as done.
Step 4. AthenaUi prints a message to inform the user of whether the command has succeeded or failed.
The following sequence diagram illustrates how Step 3 of the marking task as done operation works:
Delete task feature
The mechanism to delete a task is facilitated by the DeleteCommand class. The user is able to delete a task with the delete command.
DeleteCommand#execute is called and the Task selected by the user is deleted from the TaskList.
DeleteCommand and TaskList implements the following operations:
DeleteCommand#execute- Passes the task number of the corresponding task toTaskListto delete the task, then callsAthenaUito print a message to the output.TaskList#deleteTask- Searches for the task with the given task number, then deletes it.
The process starts with Parser#parse parsing the user input and returning a DeleteCommand object. This is described in the User command processing section.
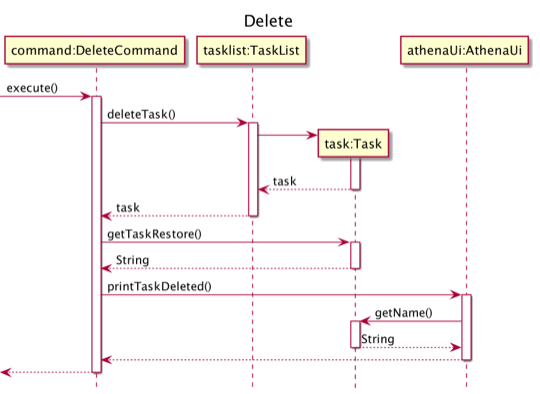
Given below is an example usage scenario and how this mechanism behaves at each step.
Step 1. The user launches the application. The TaskList contains at least one Task.
Step 2. The user deletes Task 1 by entering delete 1. Parser#parse parses the user input, and creates a DeleteCommand object. The DeleteCommand object is returned to Athena.
Step 3. Athena calls DeleteCommand#execute, which calls TaskList#deleteTask to delete Task 1. Task 1 is now deleted.

Step 4. AthenaUi prints a message to inform the user of whether the command has succeeded or failed.
The following sequence diagram illustrates how Step 3 of the task deleting operation works:
View task feature
The mechanism to view a task is facilitated by the ViewCommand class. The user is able to view a task with the view command.
ViewCommand#execute is called and the details of the Task selected by the user are displayed by the TaskList.
ViewCommand and TaskList implement the following operations:
ViewCommand#execute- Passes the selected task number toTaskListof that task that is to be viewed, then callsAthenaUito print a message to the output.TaskList#getTaskDescription- Searches for the task with the given number, and return the details of the task.
The process starts with Parser#parse parsing the user input and returning a ViewCommand object. This is described in the User command processing section.
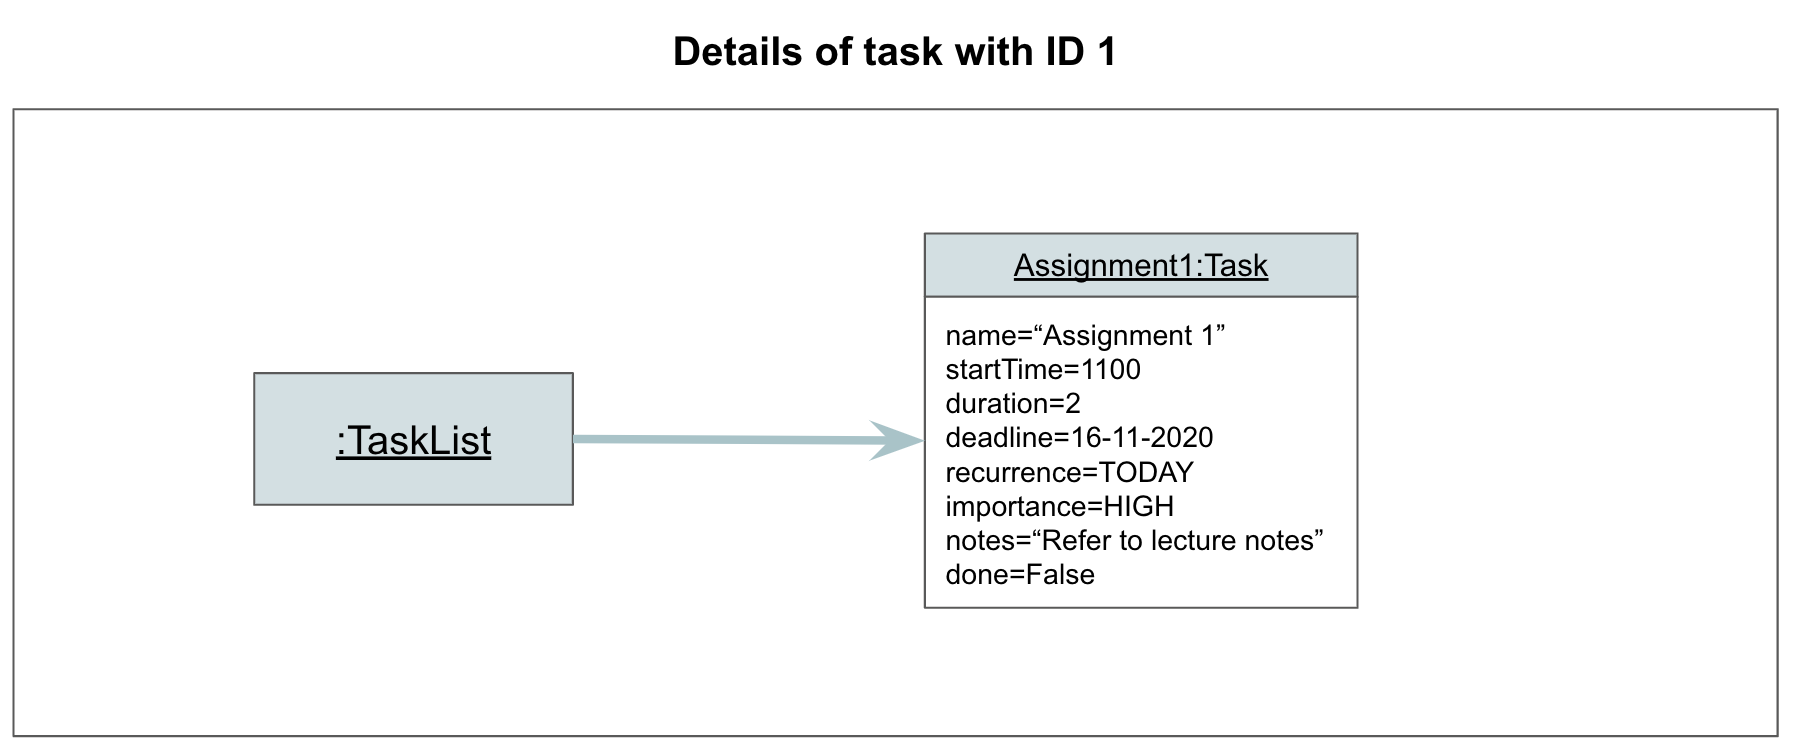
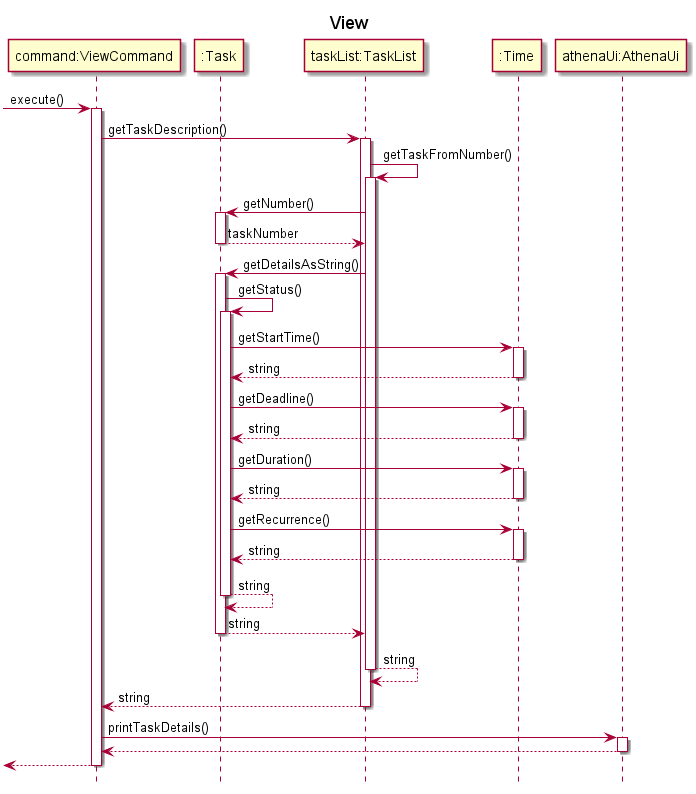
Given below is an example usage scenario and how this mechanism behaves at each step.
Step 1. The user launches the application. The TaskList contains at least one Task.
Step 2. The user views Task 1 by entering view 1. Parser#parse parses the user input, and creates a ViewCommand object. The ViewCommand object is returned to Athena.
Step 3. Athena calls ViewCommand#execute, which calls TaskList to view Task 1. The details of Task 1 can now be viewed.
Step 4. AthenaUi prints a message to inform the user of whether the command has succeeded or failed.
The following sequence diagram illustrates how Step 3 of the task viewing operation works:
Time allocation to task in timetable
The time allocation mechanism is facilitated by TimeAllocator. It allocates time slots to Task objects in a TaskList that are not given a fixed time slot by the user. It implements the following operations:
Implementation
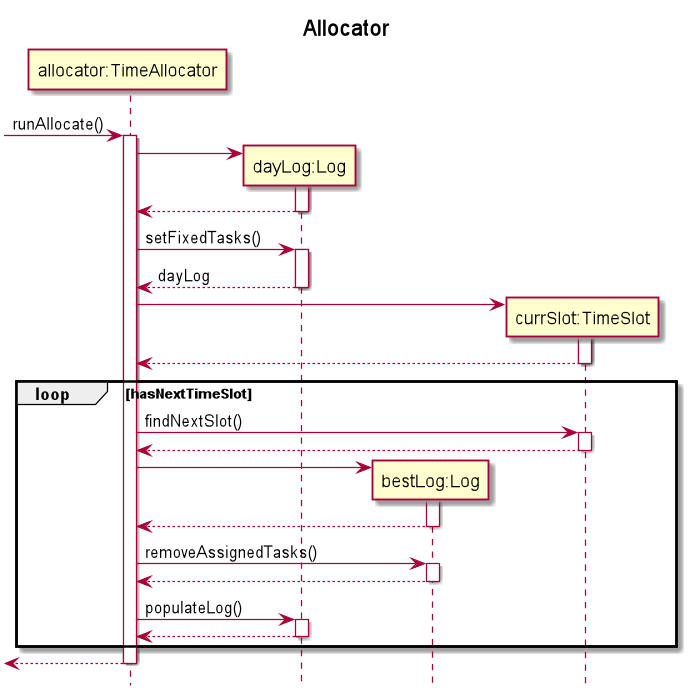
TimeAllocator#runAllocate- CreatesLogandTimeSlotobjects based on the tasks available. It also changes thestartTimeof the allocated tasks.
When Athena executes any command, the current Tasklist is used to generate a TimeAllocator object.
TimeAllocator keeps tasklist,fixedTaskList and flexibleTaskList objects.
TimeAllocator#runAllocate creates a Log object named dayLog and a TimeSlot object to keep track of the current allocations for the day.
Before the allocation of Task objects begin, an ArrayList unassignedTimeTasks is created from flexibleTaskList.
Fixed tasks that occur on the same day are placed into the dayLog first.
TimeSlot#findNextSlot continually finds the next possible locations for the Task objects in flexibleTaskList.
The method will iterate through all the combinations of Log objects with the existing flexibleTaskList until it finds one that completely takes up the time in the TimeSlot or it returns the best possible timetable after going through all the possibilities.
The dayLog is used to assign the startTime of the allocated Task objects, and also removes them from unassignedTimeTasks.
This process is repeated to fill up the time for the subsequent days.
Shown below is an example usage scenario and how the allocation mechanism behaves at each step.
Step 1. The user launches the application. The data.csv file located next to the application JAR file contains 5 tasks. These tasks are loaded into the TaskList. 3 of them have a fixed time slot, while the other 2 are not assigned any time slot.
Step 2. The user executes any command and the allocator will run automatically.
Step 3. The application allocates a time slot for the Task objects without a fixed time slot.
The following sequence diagram illustrates how the allocate operation works:
Step 4. The user executes list to get an overview of the week. The user sees all 5 tasks in the printed timetable.
Appendix: Instructions for manual testing
Given below are instructions to test the app manually.
Launch and shutdown
-
Initial launch
- Ensure that you have Java 11 or above installed.
- Download the latest version of ATHENA here.
- Copy the downloaded Athena.jar into your Desktop.
- Open the terminal/command prompt and enter
cd Desktop. -
Then, enter
java -jar Athena.jar.Expected: Shows the command line interface with welcome message.
-
Shutdown ATHENA
-
Enter
exitinto the terminal/command prompt while ATHENA is running.Expected: A farewell message by ATHENA will be shown.
-
Adding a task
Adding a task to the list.
-
Test case:
add n/Assignment1 t/1100 D/16-09-2020 d/2 r/Today i/high a/Refer to lecture notesExpected: First task is added to the list. Details of the added task are shown.
-
Test case:
add t/1100 D/16-09-2020Expected: No task is added. Error details are shown.
Editing a task
Editing a task details while all tasks are shown.
Prerequisites: List all tasks using the list command.
-
Test case:
edit 1 n/new nameExpected: Name of the task with index 1 in the list is changed to
new name. -
Test case:
edit 1Expected: No task is edited as there are no parameters entered. Error details are shown.
-
Test case:
edit -1Expected: No task is edited. Error details are shown.
-
Other incorrect edit commands to try:
edit,edit x(where x is larger than the list size)Expected: No task is edited. Error details are shown.
Listing all tasks
Listing all the tasks with or without filters.
-
Test case:
list
Expected: All the tasks will be listed. -
Test case:
list i/HIGH f/TODAY
Expected: All the tasks today with high importance will be shown. -
Test case:
list f/TOMORROW
Expected: No task is listed. Error details is shown.
Marking a task as done
Marking a task as done while all tasks are shown.
Prerequisites: List all tasks using the list command.
-
Test case:
done 1Expected: Task with index 1 is marked as done in the list. Details of the task are shown.
-
Test case:
done -1Expected: No task is marked as done. Error details are shown.
-
Other incorrect delete commands to try:
done,done x(where x is larger than the list size)Expected: No task is marked as done. Error details are shown.
Deleting a task
Deleting a task while all tasks are shown.
Prerequisite: List all tasks using the list command to see the existing tasks.
-
Test case:
delete 0Prerequisite: There should be at least one task in the list. If not, follow the steps in Adding a task to add a task.
Expected: Task with index 0 is deleted from the list. Details of the deleted task are shown.
-
Test case:
delete -1Expected: No task is deleted. Error details are shown.
-
Other incorrect delete commands to try:
delete,delete x(x can be any number that doesn’t belong to a task in the list)Expected: No task is deleted. Error details are shown.
Viewing the full details of a task
Viewing a task details while all tasks are shown.
Prerequisites: List all tasks using the list command.
-
Test case:
view 1Expected: Details of the task with index 1 in the list are shown.
-
Test case:
view -1Expected: No task details are shown. Error details are shown.
-
Other incorrect view commands to try:
view,view x(where x is larger than the list size)Expected: No task details are shown. Error details are shown.
Help
Guide on the use of ATHENA.
-
Test case:
helpExpected: A guide on how to use ATHENA will be shown.
Data storage
Storage of user data (i.e. tasks).
Testing if ATHENA is able to handle corrupted data files.
Prerequisite: Open data.csv located next to Athena.jar.
-
Test case: Add
,aaaaat the end of the last line.Problem: The task on that line is corrupted.
Expected: When you launch Athena again, it will fail to start, and an error message will be given.
-
Test case: Remove one of the commas (
,) from the file. (If data.csv is not empty)Problem: The task on that line is corrupted.
Expected: When you launch Athena again, it will fail to start, and an error message will be given.
-
Test case: Add
aaaaaat the end of the file.Problem: An invalid task is added.
Expected: When you launch Athena again, it will fail to start, and an error message will be given.
Appendix: Requirements
Product scope
Target user profile
- is a university student
- has a need to manage a significant number of tasks
- can type fast and prefers typing over mouse interactions
- is comfortable using the command line interface
Value proposition
- ATHENA helps students to automate the process of organising their schedule. After the user inputs pre-allocated time slots for work and relaxation, ATHENA figures out the best theoretical timetable based on the user’s needs.
- The timetable can be updated anytime during the week.
- ATHENA helps to reduce the amount of time and effort that users need to spend planning their time by finding free spaces to slot tasks in, with the goal of reducing dead space in the user’s timetable.
- The planner will also make sure the user has enough time to eat, exercise and sleep. The user can set up ATHENA to follow a fixed weekly routine, and only needs to update a task list. ATHENA will then plan the timetable based on the importance and deadlines of the tasks in the list, making sure that the user is able to finish everything on time.
User Stories
| Version | As a … | I want to … | So that I … |
|---|---|---|---|
v1.0 |
forgetful student | upload my tasks for the week | remember to do them |
v1.0 |
student | mark my tasks as done | know that I have done them and can put them aside |
v1.0 |
student | get reminded to do the tasks that are due soon | will be on time |
v1.0 |
student | edit the tasks I added | update accordingly to small changes |
v1.0 |
student | delete the tasks I added | remove tasks that are not needed to do anymore |
v1.0 |
student | set my tasks according to importance | complete the more important tasks first |
v1.0 |
student | leave some notes for a task | remember about it |
v2.0 |
student | have a planner that tells me what time to rest | don’t exhaust myself |
v2.0 |
student | see an overview of the week ahead | make sure that I am staying on top of my tasks |
v2.0 |
student | view the details of a task | can ensure I am on the right track with tasks |
v2.0 |
busy student | know what tasks to work on next | don’t need to spend time planning |
Non-Functional Requirements
- Should work on any mainstream OS as long as it has Java
11installed. - A user with above average typing speed for regular English text should be able to use the features of ATHENA faster than by using the mouse.
- A user who wants to manually modify the save file can do so by using a text editor or spreadsheet application.
Other Guides: Documentation, Testing, Dev-ops
This section contains links to other relevant guides that may be of use.
Glossary
- Mainstream OS: Windows, Linux, Unix, OS-X
- Task: The activity a user intends to schedule. It could be a lecture, a social gathering, etc.
- Flexible Task: A task without an explicit time given by the user. ATHENA will allocate or shift the task based on the rest of the timetable.
- Fixed Task: A task with an explicit time given by the user. These tasks can be edited freely.
- Command: An instruction meant to update the TaskList in a certain way.